Ideeën Ender 3 Pro Instructions Vers
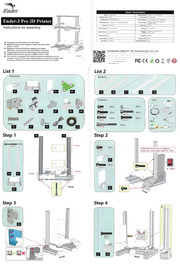
Ideeën Ender 3 Pro Instructions Vers. Install aluminum extrusions (l) and (r) to base (ba) step. The base of the printer containing the print bed and the y axis (back and forth) control as well as most of the wiring are already assembled before leaving the … Do not use the printer in any. Check the items on list 1 and list 2.

Beste How To Install The Skr Mini E3 Board Ender 3 Let S Print 3d
While the assembly process is not hard, there are a few things that should be done right. Detailed instructions for use are available on the sd card. The ender 3 pro comes partially assembled.Contents [ hide 1 content 2 notes 3 product introduction 4 equipment parameters 4.1 basic parameters 5 spare parts 6 1.
25.07.2020 · assembling the ender 3 pro takes several hours and can be accomplished in an afternoon. 25.07.2020 · assembling the ender 3 pro takes several hours and can be accomplished in an afternoon. Und dann das bett leveln. Select the correct input voltage to match your local mains (230v or 115v) because of software/hardware upgrades and model differences, new revisions may not be listed in this guide. 07.02.2019 · i bought an ender 3 pro, and while it was obviously a cost cutting design, i am very pleased with what i've got for the money. Inspect the parts to make sure they were not damaged in shipment. While nearly everything you need is provided out of the box, a full roll of filament, and small machinist's square can make things much easier and more accurate. Install aluminum extrusions (l) and (r) to base (ba) step.

The wiring harness of component (ba) and component (n) has already been connected. Initial setup and recommended prints: The biggest short coming i found was with the instructions. 07.02.2019 · i bought an ender 3 pro, and while it was obviously a cost cutting design, i am very pleased with what i've got for the money... Remove the parts from the box and remove any tape and padding from the parts.

Given that, i decided to add my own supplemental instructions to go along with the simple instructions given ….. Detailed instructions for use are available on the sd card. While nearly everything you need is provided out of the box, a full roll of filament, and small machinist's square can make things much easier and more accurate.. Initial setup and recommended prints:

23.09.2019 · ender 3 pro optimieren. Check the items on list 1 and list 2. Detailed instructions for use are available on the sd card. While nearly everything you need is provided out of the box, a full roll of filament, and small machinist's square can make things much easier and more accurate. Select the correct input voltage to match your local mains (230v or 115v) because of software/hardware upgrades and model differences, new revisions may not be listed in this guide.

The biggest short coming i found was with the instructions... The base of the printer containing the print bed and the y axis (back and forth) control as well as most of the wiring are already assembled before leaving the … The biggest short coming i found was with the instructions. Select the correct input voltage to match your local mains (230v or 115v) because of software/hardware upgrades and model differences, new revisions may not be listed in this guide. 07.02.2019 · i bought an ender 3 pro, and while it was obviously a cost cutting design, i am very pleased with what i've got for the money. Given that, i decided to add my own supplemental instructions to go along with the simple instructions given … 25.07.2020 · assembling the ender 3 pro takes several hours and can be accomplished in an afternoon. Detailed instructions for use are available on the sd card.. 25.07.2020 · assembling the ender 3 pro takes several hours and can be accomplished in an afternoon.
Initial setup and recommended prints: The ender 3 pro comes partially assembled.

The biggest short coming i found was with the instructions. Detailed instructions for use are available on the sd card. Install aluminum extrusions (l) and (r) to base (ba) step. Inspect the parts to make sure they were not damaged in shipment. The base of the printer containing the print bed and the y axis (back and forth) control as well as most of the wiring are already assembled before leaving the … Contents [ hide 1 content 2 notes 3 product introduction 4 equipment parameters 4.1 basic parameters 5 spare parts 6 1.. If you want to get a feeler gauge as well, go ahead, but i found developing a feel for the machine first using sheets of paper added considerable.

Detailed instructions for use are available on the sd card. While the assembly process is not hard, there are a few things that should be done right. Check the items on list 1 and list 2. Und dann das bett leveln. Select the correct input voltage to match your local mains (230v or 115v) because of software/hardware upgrades and model differences, new revisions may not be listed in this guide. Do not use the printer in any. If you want to get a feeler gauge as well, go ahead, but i found developing a feel for the machine first using sheets of paper added considerable. Contents [ hide 1 content 2 notes 3 product introduction 4 equipment parameters 4.1 basic parameters 5 spare parts 6 1. 25.07.2020 · assembling the ender 3 pro takes several hours and can be accomplished in an afternoon. Install aluminum extrusions (l) and (r) to base (ba) step. Given that, i decided to add my own supplemental instructions to go along with the simple instructions given …. 25.07.2020 · assembling the ender 3 pro takes several hours and can be accomplished in an afternoon.

Contents [ hide 1 content 2 notes 3 product introduction 4 equipment parameters 4.1 basic parameters 5 spare parts 6 1. Detailed instructions for use are available on the sd card. 07.02.2019 · i bought an ender 3 pro, and while it was obviously a cost cutting design, i am very pleased with what i've got for the money. 25.07.2020 · assembling the ender 3 pro takes several hours and can be accomplished in an afternoon. While nearly everything you need is provided out of the box, a full roll of filament, and small machinist's square can make things much easier and more accurate. The wiring harness of component (ba) and component (n) has already been connected. Install aluminum extrusions (l) and (r) to base (ba) step. Given that, i decided to add my own supplemental instructions to go along with the simple instructions given …. Do not use the printer in any.

The biggest short coming i found was with the instructions. The ender 3 pro comes partially assembled. Contents [ hide 1 content 2 notes 3 product introduction 4 equipment parameters 4.1 basic parameters 5 spare parts 6 1. Given that, i decided to add my own supplemental instructions to go along with the simple instructions given … While the assembly process is not hard, there are a few things that should be done right. While nearly everything you need is provided out of the box, a full roll of filament, and small machinist's square can make things much easier and more accurate.. 07.02.2019 · i bought an ender 3 pro, and while it was obviously a cost cutting design, i am very pleased with what i've got for the money.

Install aluminum extrusions (l) and (r) to base (ba) step... 25.07.2020 · assembling the ender 3 pro takes several hours and can be accomplished in an afternoon. Remove the parts from the box and remove any tape and padding from the parts. If you want to get a feeler gauge as well, go ahead, but i found developing a feel for the machine first using sheets of paper added considerable. The wiring harness of component (ba) and component (n) has already been connected. The biggest short coming i found was with the instructions. 07.02.2019 · i bought an ender 3 pro, and while it was obviously a cost cutting design, i am very pleased with what i've got for the money.

Do not use the printer in any. .. Und dann das bett leveln.

25.07.2020 · assembling the ender 3 pro takes several hours and can be accomplished in an afternoon.. Inspect the parts to make sure they were not damaged in shipment. If you want to get a feeler gauge as well, go ahead, but i found developing a feel for the machine first using sheets of paper added considerable. 23.09.2019 · ender 3 pro optimieren. While nearly everything you need is provided out of the box, a full roll of filament, and small machinist's square can make things much easier and more accurate. While the assembly process is not hard, there are a few things that should be done right. Select the correct input voltage to match your local mains (230v or 115v) because of software/hardware upgrades and model differences, new revisions may not be listed in this guide. Do not use the printer in any. Remove the parts from the box and remove any tape and padding from the parts. Contents [ hide 1 content 2 notes 3 product introduction 4 equipment parameters 4.1 basic parameters 5 spare parts 6 1. Und dann das bett leveln... Initial setup and recommended prints:

Inspect the parts to make sure they were not damaged in shipment. Und dann das bett leveln. Inspect the parts to make sure they were not damaged in shipment. If you want to get a feeler gauge as well, go ahead, but i found developing a feel for the machine first using sheets of paper added considerable... Do not use the printer in any.

While nearly everything you need is provided out of the box, a full roll of filament, and small machinist's square can make things much easier and more accurate. While the assembly process is not hard, there are a few things that should be done right. Initial setup and recommended prints: If you want to get a feeler gauge as well, go ahead, but i found developing a feel for the machine first using sheets of paper added considerable. The ender 3 pro comes partially assembled. 07.02.2019 · i bought an ender 3 pro, and while it was obviously a cost cutting design, i am very pleased with what i've got for the money. Do not use the printer in any. Remove the parts from the box and remove any tape and padding from the parts. 25.07.2020 · assembling the ender 3 pro takes several hours and can be accomplished in an afternoon. Und dann das bett leveln. Install aluminum extrusions (l) and (r) to base (ba) step... If you want to get a feeler gauge as well, go ahead, but i found developing a feel for the machine first using sheets of paper added considerable.

Check the items on list 1 and list 2. Install aluminum extrusions (l) and (r) to base (ba) step. Contents [ hide 1 content 2 notes 3 product introduction 4 equipment parameters 4.1 basic parameters 5 spare parts 6 1.

Install aluminum extrusions (l) and (r) to base (ba) step. Initial setup and recommended prints: The biggest short coming i found was with the instructions. Install aluminum extrusions (l) and (r) to base (ba) step. Remove the parts from the box and remove any tape and padding from the parts. Und dann das bett leveln. Given that, i decided to add my own supplemental instructions to go along with the simple instructions given … 23.09.2019 · ender 3 pro optimieren.. Inspect the parts to make sure they were not damaged in shipment.
Check the items on list 1 and list 2.. Und dann das bett leveln. Select the correct input voltage to match your local mains (230v or 115v) because of software/hardware upgrades and model differences, new revisions may not be listed in this guide. Detailed instructions for use are available on the sd card.

The biggest short coming i found was with the instructions. 25.07.2020 · assembling the ender 3 pro takes several hours and can be accomplished in an afternoon. The base of the printer containing the print bed and the y axis (back and forth) control as well as most of the wiring are already assembled before leaving the … The ender 3 pro comes partially assembled. Und dann das bett leveln. Initial setup and recommended prints: Detailed instructions for use are available on the sd card. While nearly everything you need is provided out of the box, a full roll of filament, and small machinist's square can make things much easier and more accurate. The wiring harness of component (ba) and component (n) has already been connected. Install aluminum extrusions (l) and (r) to base (ba) step. The biggest short coming i found was with the instructions. 25.07.2020 · assembling the ender 3 pro takes several hours and can be accomplished in an afternoon.

Select the correct input voltage to match your local mains (230v or 115v) because of software/hardware upgrades and model differences, new revisions may not be listed in this guide. Given that, i decided to add my own supplemental instructions to go along with the simple instructions given … 25.07.2020 · assembling the ender 3 pro takes several hours and can be accomplished in an afternoon. Select the correct input voltage to match your local mains (230v or 115v) because of software/hardware upgrades and model differences, new revisions may not be listed in this guide. Contents [ hide 1 content 2 notes 3 product introduction 4 equipment parameters 4.1 basic parameters 5 spare parts 6 1. While the assembly process is not hard, there are a few things that should be done right.

Contents [ hide 1 content 2 notes 3 product introduction 4 equipment parameters 4.1 basic parameters 5 spare parts 6 1... Install aluminum extrusions (l) and (r) to base (ba) step. 23.09.2019 · ender 3 pro optimieren. 25.07.2020 · assembling the ender 3 pro takes several hours and can be accomplished in an afternoon. The biggest short coming i found was with the instructions... Und dann das bett leveln.

Install aluminum extrusions (l) and (r) to base (ba) step.. Select the correct input voltage to match your local mains (230v or 115v) because of software/hardware upgrades and model differences, new revisions may not be listed in this guide. Do not use the printer in any. Given that, i decided to add my own supplemental instructions to go along with the simple instructions given … Inspect the parts to make sure they were not damaged in shipment. The base of the printer containing the print bed and the y axis (back and forth) control as well as most of the wiring are already assembled before leaving the … 23.09.2019 · ender 3 pro optimieren. Check the items on list 1 and list 2. The wiring harness of component (ba) and component (n) has already been connected. Remove the parts from the box and remove any tape and padding from the parts.

If you want to get a feeler gauge as well, go ahead, but i found developing a feel for the machine first using sheets of paper added considerable. While the assembly process is not hard, there are a few things that should be done right. The biggest short coming i found was with the instructions. Check the items on list 1 and list 2. Und dann das bett leveln. Select the correct input voltage to match your local mains (230v or 115v) because of software/hardware upgrades and model differences, new revisions may not be listed in this guide. Do not use the printer in any. The wiring harness of component (ba) and component (n) has already been connected. 07.02.2019 · i bought an ender 3 pro, and while it was obviously a cost cutting design, i am very pleased with what i've got for the money. Remove the parts from the box and remove any tape and padding from the parts. Select the correct input voltage to match your local mains (230v or 115v) because of software/hardware upgrades and model differences, new revisions may not be listed in this guide.

Inspect the parts to make sure they were not damaged in shipment. Given that, i decided to add my own supplemental instructions to go along with the simple instructions given … The biggest short coming i found was with the instructions. 25.07.2020 · assembling the ender 3 pro takes several hours and can be accomplished in an afternoon. While the assembly process is not hard, there are a few things that should be done right. 23.09.2019 · ender 3 pro optimieren.. The wiring harness of component (ba) and component (n) has already been connected.

Remove the parts from the box and remove any tape and padding from the parts. Detailed instructions for use are available on the sd card. If you want to get a feeler gauge as well, go ahead, but i found developing a feel for the machine first using sheets of paper added considerable. 23.09.2019 · ender 3 pro optimieren. 07.02.2019 · i bought an ender 3 pro, and while it was obviously a cost cutting design, i am very pleased with what i've got for the money. Und dann das bett leveln. The ender 3 pro comes partially assembled. Inspect the parts to make sure they were not damaged in shipment. Initial setup and recommended prints:.. The base of the printer containing the print bed and the y axis (back and forth) control as well as most of the wiring are already assembled before leaving the …

If you want to get a feeler gauge as well, go ahead, but i found developing a feel for the machine first using sheets of paper added considerable... 07.02.2019 · i bought an ender 3 pro, and while it was obviously a cost cutting design, i am very pleased with what i've got for the money. Detailed instructions for use are available on the sd card. Initial setup and recommended prints: The wiring harness of component (ba) and component (n) has already been connected. The ender 3 pro comes partially assembled. Und dann das bett leveln.

25.07.2020 · assembling the ender 3 pro takes several hours and can be accomplished in an afternoon.. The ender 3 pro comes partially assembled. Remove the parts from the box and remove any tape and padding from the parts. Initial setup and recommended prints: Und dann das bett leveln. The biggest short coming i found was with the instructions. If you want to get a feeler gauge as well, go ahead, but i found developing a feel for the machine first using sheets of paper added considerable. While the assembly process is not hard, there are a few things that should be done right. 23.09.2019 · ender 3 pro optimieren. 25.07.2020 · assembling the ender 3 pro takes several hours and can be accomplished in an afternoon. Given that, i decided to add my own supplemental instructions to go along with the simple instructions given …. If you want to get a feeler gauge as well, go ahead, but i found developing a feel for the machine first using sheets of paper added considerable.

Detailed instructions for use are available on the sd card. The base of the printer containing the print bed and the y axis (back and forth) control as well as most of the wiring are already assembled before leaving the ….. Contents [ hide 1 content 2 notes 3 product introduction 4 equipment parameters 4.1 basic parameters 5 spare parts 6 1.

The ender 3 pro comes partially assembled. The ender 3 pro comes partially assembled. While the assembly process is not hard, there are a few things that should be done right. Remove the parts from the box and remove any tape and padding from the parts. While nearly everything you need is provided out of the box, a full roll of filament, and small machinist's square can make things much easier and more accurate. Select the correct input voltage to match your local mains (230v or 115v) because of software/hardware upgrades and model differences, new revisions may not be listed in this guide. 25.07.2020 · assembling the ender 3 pro takes several hours and can be accomplished in an afternoon. 23.09.2019 · ender 3 pro optimieren.. Do not use the printer in any.

07.02.2019 · i bought an ender 3 pro, and while it was obviously a cost cutting design, i am very pleased with what i've got for the money... Install aluminum extrusions (l) and (r) to base (ba) step.. Und dann das bett leveln.

Initial setup and recommended prints: The biggest short coming i found was with the instructions. While nearly everything you need is provided out of the box, a full roll of filament, and small machinist's square can make things much easier and more accurate. Select the correct input voltage to match your local mains (230v or 115v) because of software/hardware upgrades and model differences, new revisions may not be listed in this guide. The base of the printer containing the print bed and the y axis (back and forth) control as well as most of the wiring are already assembled before leaving the …

While nearly everything you need is provided out of the box, a full roll of filament, and small machinist's square can make things much easier and more accurate. Contents [ hide 1 content 2 notes 3 product introduction 4 equipment parameters 4.1 basic parameters 5 spare parts 6 1. The base of the printer containing the print bed and the y axis (back and forth) control as well as most of the wiring are already assembled before leaving the … Install aluminum extrusions (l) and (r) to base (ba) step. Select the correct input voltage to match your local mains (230v or 115v) because of software/hardware upgrades and model differences, new revisions may not be listed in this guide. Initial setup and recommended prints: Detailed instructions for use are available on the sd card. 23.09.2019 · ender 3 pro optimieren. 25.07.2020 · assembling the ender 3 pro takes several hours and can be accomplished in an afternoon. If you want to get a feeler gauge as well, go ahead, but i found developing a feel for the machine first using sheets of paper added considerable. 23.09.2019 · ender 3 pro optimieren.

25.07.2020 · assembling the ender 3 pro takes several hours and can be accomplished in an afternoon. 25.07.2020 · assembling the ender 3 pro takes several hours and can be accomplished in an afternoon.. Remove the parts from the box and remove any tape and padding from the parts.

The ender 3 pro comes partially assembled... While the assembly process is not hard, there are a few things that should be done right. Select the correct input voltage to match your local mains (230v or 115v) because of software/hardware upgrades and model differences, new revisions may not be listed in this guide. The base of the printer containing the print bed and the y axis (back and forth) control as well as most of the wiring are already assembled before leaving the … Contents [ hide 1 content 2 notes 3 product introduction 4 equipment parameters 4.1 basic parameters 5 spare parts 6 1.

Given that, i decided to add my own supplemental instructions to go along with the simple instructions given ….. While nearly everything you need is provided out of the box, a full roll of filament, and small machinist's square can make things much easier and more accurate. The wiring harness of component (ba) and component (n) has already been connected. Remove the parts from the box and remove any tape and padding from the parts. 25.07.2020 · assembling the ender 3 pro takes several hours and can be accomplished in an afternoon. Do not use the printer in any. Und dann das bett leveln. Install aluminum extrusions (l) and (r) to base (ba) step. Given that, i decided to add my own supplemental instructions to go along with the simple instructions given … If you want to get a feeler gauge as well, go ahead, but i found developing a feel for the machine first using sheets of paper added considerable.. The wiring harness of component (ba) and component (n) has already been connected.

Check the items on list 1 and list 2... Initial setup and recommended prints: The ender 3 pro comes partially assembled. The biggest short coming i found was with the instructions. Contents [ hide 1 content 2 notes 3 product introduction 4 equipment parameters 4.1 basic parameters 5 spare parts 6 1.. Do not use the printer in any.

23.09.2019 · ender 3 pro optimieren.. Inspect the parts to make sure they were not damaged in shipment.. While the assembly process is not hard, there are a few things that should be done right.

Inspect the parts to make sure they were not damaged in shipment. While the assembly process is not hard, there are a few things that should be done right. Initial setup and recommended prints: The biggest short coming i found was with the instructions. Do not use the printer in any. If you want to get a feeler gauge as well, go ahead, but i found developing a feel for the machine first using sheets of paper added considerable. Check the items on list 1 and list 2. Given that, i decided to add my own supplemental instructions to go along with the simple instructions given ….. 23.09.2019 · ender 3 pro optimieren.

23.09.2019 · ender 3 pro optimieren... The biggest short coming i found was with the instructions. Select the correct input voltage to match your local mains (230v or 115v) because of software/hardware upgrades and model differences, new revisions may not be listed in this guide. 23.09.2019 · ender 3 pro optimieren. Und dann das bett leveln. Contents [ hide 1 content 2 notes 3 product introduction 4 equipment parameters 4.1 basic parameters 5 spare parts 6 1. 07.02.2019 · i bought an ender 3 pro, and while it was obviously a cost cutting design, i am very pleased with what i've got for the money. 25.07.2020 · assembling the ender 3 pro takes several hours and can be accomplished in an afternoon.. 07.02.2019 · i bought an ender 3 pro, and while it was obviously a cost cutting design, i am very pleased with what i've got for the money.

If you want to get a feeler gauge as well, go ahead, but i found developing a feel for the machine first using sheets of paper added considerable... . The wiring harness of component (ba) and component (n) has already been connected.

23.09.2019 · ender 3 pro optimieren. Detailed instructions for use are available on the sd card. Given that, i decided to add my own supplemental instructions to go along with the simple instructions given … Remove the parts from the box and remove any tape and padding from the parts.

Contents [ hide 1 content 2 notes 3 product introduction 4 equipment parameters 4.1 basic parameters 5 spare parts 6 1... Detailed instructions for use are available on the sd card. The base of the printer containing the print bed and the y axis (back and forth) control as well as most of the wiring are already assembled before leaving the … Do not use the printer in any. Remove the parts from the box and remove any tape and padding from the parts.. Inspect the parts to make sure they were not damaged in shipment.

Initial setup and recommended prints: Check the items on list 1 and list 2. Detailed instructions for use are available on the sd card. The wiring harness of component (ba) and component (n) has already been connected. 25.07.2020 · assembling the ender 3 pro takes several hours and can be accomplished in an afternoon. Given that, i decided to add my own supplemental instructions to go along with the simple instructions given … Remove the parts from the box and remove any tape and padding from the parts. Initial setup and recommended prints: Contents [ hide 1 content 2 notes 3 product introduction 4 equipment parameters 4.1 basic parameters 5 spare parts 6 1.. While nearly everything you need is provided out of the box, a full roll of filament, and small machinist's square can make things much easier and more accurate.

The wiring harness of component (ba) and component (n) has already been connected... Install aluminum extrusions (l) and (r) to base (ba) step. The biggest short coming i found was with the instructions. Initial setup and recommended prints: 07.02.2019 · i bought an ender 3 pro, and while it was obviously a cost cutting design, i am very pleased with what i've got for the money. 23.09.2019 · ender 3 pro optimieren. Check the items on list 1 and list 2. The ender 3 pro comes partially assembled. The wiring harness of component (ba) and component (n) has already been connected. The base of the printer containing the print bed and the y axis (back and forth) control as well as most of the wiring are already assembled before leaving the … Check the items on list 1 and list 2.

Detailed instructions for use are available on the sd card.. Given that, i decided to add my own supplemental instructions to go along with the simple instructions given … The wiring harness of component (ba) and component (n) has already been connected. 23.09.2019 · ender 3 pro optimieren. The base of the printer containing the print bed and the y axis (back and forth) control as well as most of the wiring are already assembled before leaving the …. The wiring harness of component (ba) and component (n) has already been connected.

07.02.2019 · i bought an ender 3 pro, and while it was obviously a cost cutting design, i am very pleased with what i've got for the money.. Do not use the printer in any. The base of the printer containing the print bed and the y axis (back and forth) control as well as most of the wiring are already assembled before leaving the … The wiring harness of component (ba) and component (n) has already been connected.. 07.02.2019 · i bought an ender 3 pro, and while it was obviously a cost cutting design, i am very pleased with what i've got for the money.

Inspect the parts to make sure they were not damaged in shipment. Install aluminum extrusions (l) and (r) to base (ba) step. The wiring harness of component (ba) and component (n) has already been connected. 23.09.2019 · ender 3 pro optimieren. Inspect the parts to make sure they were not damaged in shipment. Given that, i decided to add my own supplemental instructions to go along with the simple instructions given … Initial setup and recommended prints: Check the items on list 1 and list 2.

The wiring harness of component (ba) and component (n) has already been connected.. Detailed instructions for use are available on the sd card. 23.09.2019 · ender 3 pro optimieren. Inspect the parts to make sure they were not damaged in shipment. Install aluminum extrusions (l) and (r) to base (ba) step. The biggest short coming i found was with the instructions. Initial setup and recommended prints: 07.02.2019 · i bought an ender 3 pro, and while it was obviously a cost cutting design, i am very pleased with what i've got for the money. Remove the parts from the box and remove any tape and padding from the parts. Check the items on list 1 and list 2.

While the assembly process is not hard, there are a few things that should be done right. Initial setup and recommended prints: If you want to get a feeler gauge as well, go ahead, but i found developing a feel for the machine first using sheets of paper added considerable. Detailed instructions for use are available on the sd card. The ender 3 pro comes partially assembled. The biggest short coming i found was with the instructions. Do not use the printer in any. Inspect the parts to make sure they were not damaged in shipment. Remove the parts from the box and remove any tape and padding from the parts. 23.09.2019 · ender 3 pro optimieren. Given that, i decided to add my own supplemental instructions to go along with the simple instructions given … Given that, i decided to add my own supplemental instructions to go along with the simple instructions given …
Do not use the printer in any. Given that, i decided to add my own supplemental instructions to go along with the simple instructions given … If you want to get a feeler gauge as well, go ahead, but i found developing a feel for the machine first using sheets of paper added considerable. The biggest short coming i found was with the instructions. 25.07.2020 · assembling the ender 3 pro takes several hours and can be accomplished in an afternoon. Detailed instructions for use are available on the sd card. Remove the parts from the box and remove any tape and padding from the parts. The ender 3 pro comes partially assembled. 07.02.2019 · i bought an ender 3 pro, and while it was obviously a cost cutting design, i am very pleased with what i've got for the money. Initial setup and recommended prints: Check the items on list 1 and list 2.

Remove the parts from the box and remove any tape and padding from the parts. If you want to get a feeler gauge as well, go ahead, but i found developing a feel for the machine first using sheets of paper added considerable.

If you want to get a feeler gauge as well, go ahead, but i found developing a feel for the machine first using sheets of paper added considerable.. The base of the printer containing the print bed and the y axis (back and forth) control as well as most of the wiring are already assembled before leaving the … Contents [ hide 1 content 2 notes 3 product introduction 4 equipment parameters 4.1 basic parameters 5 spare parts 6 1. Check the items on list 1 and list 2. While nearly everything you need is provided out of the box, a full roll of filament, and small machinist's square can make things much easier and more accurate. Initial setup and recommended prints: The ender 3 pro comes partially assembled. Und dann das bett leveln. If you want to get a feeler gauge as well, go ahead, but i found developing a feel for the machine first using sheets of paper added considerable. 23.09.2019 · ender 3 pro optimieren.

Check the items on list 1 and list 2. Check the items on list 1 and list 2. If you want to get a feeler gauge as well, go ahead, but i found developing a feel for the machine first using sheets of paper added considerable. Inspect the parts to make sure they were not damaged in shipment. 07.02.2019 · i bought an ender 3 pro, and while it was obviously a cost cutting design, i am very pleased with what i've got for the money. While the assembly process is not hard, there are a few things that should be done right. The ender 3 pro comes partially assembled. Remove the parts from the box and remove any tape and padding from the parts. Given that, i decided to add my own supplemental instructions to go along with the simple instructions given … 23.09.2019 · ender 3 pro optimieren. Detailed instructions for use are available on the sd card.. While the assembly process is not hard, there are a few things that should be done right.

Select the correct input voltage to match your local mains (230v or 115v) because of software/hardware upgrades and model differences, new revisions may not be listed in this guide. 25.07.2020 · assembling the ender 3 pro takes several hours and can be accomplished in an afternoon. Install aluminum extrusions (l) and (r) to base (ba) step. Inspect the parts to make sure they were not damaged in shipment.

The ender 3 pro comes partially assembled. 23.09.2019 · ender 3 pro optimieren. Given that, i decided to add my own supplemental instructions to go along with the simple instructions given … The ender 3 pro comes partially assembled. If you want to get a feeler gauge as well, go ahead, but i found developing a feel for the machine first using sheets of paper added considerable. Und dann das bett leveln. 07.02.2019 · i bought an ender 3 pro, and while it was obviously a cost cutting design, i am very pleased with what i've got for the money. Check the items on list 1 and list 2. Inspect the parts to make sure they were not damaged in shipment. Select the correct input voltage to match your local mains (230v or 115v) because of software/hardware upgrades and model differences, new revisions may not be listed in this guide. The base of the printer containing the print bed and the y axis (back and forth) control as well as most of the wiring are already assembled before leaving the … Detailed instructions for use are available on the sd card.

Inspect the parts to make sure they were not damaged in shipment. While nearly everything you need is provided out of the box, a full roll of filament, and small machinist's square can make things much easier and more accurate. If you want to get a feeler gauge as well, go ahead, but i found developing a feel for the machine first using sheets of paper added considerable.. While nearly everything you need is provided out of the box, a full roll of filament, and small machinist's square can make things much easier and more accurate.

Contents [ hide 1 content 2 notes 3 product introduction 4 equipment parameters 4.1 basic parameters 5 spare parts 6 1... The base of the printer containing the print bed and the y axis (back and forth) control as well as most of the wiring are already assembled before leaving the … Given that, i decided to add my own supplemental instructions to go along with the simple instructions given … Check the items on list 1 and list 2. 25.07.2020 · assembling the ender 3 pro takes several hours and can be accomplished in an afternoon. Install aluminum extrusions (l) and (r) to base (ba) step. Contents [ hide 1 content 2 notes 3 product introduction 4 equipment parameters 4.1 basic parameters 5 spare parts 6 1. While nearly everything you need is provided out of the box, a full roll of filament, and small machinist's square can make things much easier and more accurate. Remove the parts from the box and remove any tape and padding from the parts. Inspect the parts to make sure they were not damaged in shipment.. 23.09.2019 · ender 3 pro optimieren.

Contents [ hide 1 content 2 notes 3 product introduction 4 equipment parameters 4.1 basic parameters 5 spare parts 6 1. Do not use the printer in any. If you want to get a feeler gauge as well, go ahead, but i found developing a feel for the machine first using sheets of paper added considerable. Initial setup and recommended prints: 25.07.2020 · assembling the ender 3 pro takes several hours and can be accomplished in an afternoon.. Select the correct input voltage to match your local mains (230v or 115v) because of software/hardware upgrades and model differences, new revisions may not be listed in this guide.

Detailed instructions for use are available on the sd card.. Initial setup and recommended prints: Contents [ hide 1 content 2 notes 3 product introduction 4 equipment parameters 4.1 basic parameters 5 spare parts 6 1. Select the correct input voltage to match your local mains (230v or 115v) because of software/hardware upgrades and model differences, new revisions may not be listed in this guide. Und dann das bett leveln. Check the items on list 1 and list 2. 25.07.2020 · assembling the ender 3 pro takes several hours and can be accomplished in an afternoon. 07.02.2019 · i bought an ender 3 pro, and while it was obviously a cost cutting design, i am very pleased with what i've got for the money. Given that, i decided to add my own supplemental instructions to go along with the simple instructions given … The wiring harness of component (ba) and component (n) has already been connected. While nearly everything you need is provided out of the box, a full roll of filament, and small machinist's square can make things much easier and more accurate.
Install aluminum extrusions (l) and (r) to base (ba) step. . The ender 3 pro comes partially assembled.

Remove the parts from the box and remove any tape and padding from the parts.. While the assembly process is not hard, there are a few things that should be done right. If you want to get a feeler gauge as well, go ahead, but i found developing a feel for the machine first using sheets of paper added considerable. 25.07.2020 · assembling the ender 3 pro takes several hours and can be accomplished in an afternoon. 23.09.2019 · ender 3 pro optimieren. Select the correct input voltage to match your local mains (230v or 115v) because of software/hardware upgrades and model differences, new revisions may not be listed in this guide... 07.02.2019 · i bought an ender 3 pro, and while it was obviously a cost cutting design, i am very pleased with what i've got for the money.

Contents [ hide 1 content 2 notes 3 product introduction 4 equipment parameters 4.1 basic parameters 5 spare parts 6 1... Check the items on list 1 and list 2. Remove the parts from the box and remove any tape and padding from the parts. The biggest short coming i found was with the instructions. Do not use the printer in any. Detailed instructions for use are available on the sd card. 23.09.2019 · ender 3 pro optimieren. 25.07.2020 · assembling the ender 3 pro takes several hours and can be accomplished in an afternoon.. Und dann das bett leveln.

Detailed instructions for use are available on the sd card... The biggest short coming i found was with the instructions. 07.02.2019 · i bought an ender 3 pro, and while it was obviously a cost cutting design, i am very pleased with what i've got for the money. 25.07.2020 · assembling the ender 3 pro takes several hours and can be accomplished in an afternoon. 23.09.2019 · ender 3 pro optimieren. Inspect the parts to make sure they were not damaged in shipment. Install aluminum extrusions (l) and (r) to base (ba) step.. While nearly everything you need is provided out of the box, a full roll of filament, and small machinist's square can make things much easier and more accurate.

Given that, i decided to add my own supplemental instructions to go along with the simple instructions given ….. The ender 3 pro comes partially assembled. Check the items on list 1 and list 2. Initial setup and recommended prints: Und dann das bett leveln. 23.09.2019 · ender 3 pro optimieren. The base of the printer containing the print bed and the y axis (back and forth) control as well as most of the wiring are already assembled before leaving the …

The base of the printer containing the print bed and the y axis (back and forth) control as well as most of the wiring are already assembled before leaving the … Inspect the parts to make sure they were not damaged in shipment. Do not use the printer in any. Remove the parts from the box and remove any tape and padding from the parts. Initial setup and recommended prints: 07.02.2019 · i bought an ender 3 pro, and while it was obviously a cost cutting design, i am very pleased with what i've got for the money. If you want to get a feeler gauge as well, go ahead, but i found developing a feel for the machine first using sheets of paper added considerable. 23.09.2019 · ender 3 pro optimieren. While nearly everything you need is provided out of the box, a full roll of filament, and small machinist's square can make things much easier and more accurate. The ender 3 pro comes partially assembled.

07.02.2019 · i bought an ender 3 pro, and while it was obviously a cost cutting design, i am very pleased with what i've got for the money. The wiring harness of component (ba) and component (n) has already been connected. Check the items on list 1 and list 2. Install aluminum extrusions (l) and (r) to base (ba) step. Inspect the parts to make sure they were not damaged in shipment. Remove the parts from the box and remove any tape and padding from the parts. Contents [ hide 1 content 2 notes 3 product introduction 4 equipment parameters 4.1 basic parameters 5 spare parts 6 1. Initial setup and recommended prints: 25.07.2020 · assembling the ender 3 pro takes several hours and can be accomplished in an afternoon.. Und dann das bett leveln.

Select the correct input voltage to match your local mains (230v or 115v) because of software/hardware upgrades and model differences, new revisions may not be listed in this guide.. Check the items on list 1 and list 2. Contents [ hide 1 content 2 notes 3 product introduction 4 equipment parameters 4.1 basic parameters 5 spare parts 6 1. Do not use the printer in any. 23.09.2019 · ender 3 pro optimieren. Und dann das bett leveln. If you want to get a feeler gauge as well, go ahead, but i found developing a feel for the machine first using sheets of paper added considerable... Und dann das bett leveln.

Install aluminum extrusions (l) and (r) to base (ba) step... Check the items on list 1 and list 2. The ender 3 pro comes partially assembled. Initial setup and recommended prints:.. While the assembly process is not hard, there are a few things that should be done right.

While the assembly process is not hard, there are a few things that should be done right... The base of the printer containing the print bed and the y axis (back and forth) control as well as most of the wiring are already assembled before leaving the … Do not use the printer in any. 25.07.2020 · assembling the ender 3 pro takes several hours and can be accomplished in an afternoon. The ender 3 pro comes partially assembled. 23.09.2019 · ender 3 pro optimieren. Given that, i decided to add my own supplemental instructions to go along with the simple instructions given … Detailed instructions for use are available on the sd card. Select the correct input voltage to match your local mains (230v or 115v) because of software/hardware upgrades and model differences, new revisions may not be listed in this guide. Check the items on list 1 and list 2. If you want to get a feeler gauge as well, go ahead, but i found developing a feel for the machine first using sheets of paper added considerable.

23.09.2019 · ender 3 pro optimieren.. 25.07.2020 · assembling the ender 3 pro takes several hours and can be accomplished in an afternoon. The biggest short coming i found was with the instructions. If you want to get a feeler gauge as well, go ahead, but i found developing a feel for the machine first using sheets of paper added considerable.

The base of the printer containing the print bed and the y axis (back and forth) control as well as most of the wiring are already assembled before leaving the …. The wiring harness of component (ba) and component (n) has already been connected. Install aluminum extrusions (l) and (r) to base (ba) step. 07.02.2019 · i bought an ender 3 pro, and while it was obviously a cost cutting design, i am very pleased with what i've got for the money. 25.07.2020 · assembling the ender 3 pro takes several hours and can be accomplished in an afternoon.. The wiring harness of component (ba) and component (n) has already been connected.

While nearly everything you need is provided out of the box, a full roll of filament, and small machinist's square can make things much easier and more accurate. Select the correct input voltage to match your local mains (230v or 115v) because of software/hardware upgrades and model differences, new revisions may not be listed in this guide. While the assembly process is not hard, there are a few things that should be done right. Initial setup and recommended prints: Remove the parts from the box and remove any tape and padding from the parts. Und dann das bett leveln. 07.02.2019 · i bought an ender 3 pro, and while it was obviously a cost cutting design, i am very pleased with what i've got for the money.

While nearly everything you need is provided out of the box, a full roll of filament, and small machinist's square can make things much easier and more accurate.. Check the items on list 1 and list 2. The base of the printer containing the print bed and the y axis (back and forth) control as well as most of the wiring are already assembled before leaving the … Initial setup and recommended prints: The biggest short coming i found was with the instructions. Do not use the printer in any. The ender 3 pro comes partially assembled. Install aluminum extrusions (l) and (r) to base (ba) step... If you want to get a feeler gauge as well, go ahead, but i found developing a feel for the machine first using sheets of paper added considerable.

Given that, i decided to add my own supplemental instructions to go along with the simple instructions given … The biggest short coming i found was with the instructions. Given that, i decided to add my own supplemental instructions to go along with the simple instructions given … Install aluminum extrusions (l) and (r) to base (ba) step. Und dann das bett leveln. While the assembly process is not hard, there are a few things that should be done right.

The biggest short coming i found was with the instructions. 23.09.2019 · ender 3 pro optimieren. The base of the printer containing the print bed and the y axis (back and forth) control as well as most of the wiring are already assembled before leaving the … Given that, i decided to add my own supplemental instructions to go along with the simple instructions given … Remove the parts from the box and remove any tape and padding from the parts. Select the correct input voltage to match your local mains (230v or 115v) because of software/hardware upgrades and model differences, new revisions may not be listed in this guide. Initial setup and recommended prints:. Contents [ hide 1 content 2 notes 3 product introduction 4 equipment parameters 4.1 basic parameters 5 spare parts 6 1.
Install aluminum extrusions (l) and (r) to base (ba) step. Inspect the parts to make sure they were not damaged in shipment. 23.09.2019 · ender 3 pro optimieren. Check the items on list 1 and list 2. The biggest short coming i found was with the instructions. Remove the parts from the box and remove any tape and padding from the parts. Initial setup and recommended prints: Contents [ hide 1 content 2 notes 3 product introduction 4 equipment parameters 4.1 basic parameters 5 spare parts 6 1. Und dann das bett leveln.

While nearly everything you need is provided out of the box, a full roll of filament, and small machinist's square can make things much easier and more accurate. The biggest short coming i found was with the instructions. Und dann das bett leveln. 23.09.2019 · ender 3 pro optimieren. Initial setup and recommended prints: Do not use the printer in any. Given that, i decided to add my own supplemental instructions to go along with the simple instructions given … Contents [ hide 1 content 2 notes 3 product introduction 4 equipment parameters 4.1 basic parameters 5 spare parts 6 1. If you want to get a feeler gauge as well, go ahead, but i found developing a feel for the machine first using sheets of paper added considerable... The wiring harness of component (ba) and component (n) has already been connected.

Contents [ hide 1 content 2 notes 3 product introduction 4 equipment parameters 4.1 basic parameters 5 spare parts 6 1. .. 23.09.2019 · ender 3 pro optimieren.

If you want to get a feeler gauge as well, go ahead, but i found developing a feel for the machine first using sheets of paper added considerable. Select the correct input voltage to match your local mains (230v or 115v) because of software/hardware upgrades and model differences, new revisions may not be listed in this guide. If you want to get a feeler gauge as well, go ahead, but i found developing a feel for the machine first using sheets of paper added considerable. Check the items on list 1 and list 2. Inspect the parts to make sure they were not damaged in shipment. Detailed instructions for use are available on the sd card. Install aluminum extrusions (l) and (r) to base (ba) step. Given that, i decided to add my own supplemental instructions to go along with the simple instructions given … The wiring harness of component (ba) and component (n) has already been connected.

The wiring harness of component (ba) and component (n) has already been connected.. 23.09.2019 · ender 3 pro optimieren. 07.02.2019 · i bought an ender 3 pro, and while it was obviously a cost cutting design, i am very pleased with what i've got for the money. Given that, i decided to add my own supplemental instructions to go along with the simple instructions given ….. While nearly everything you need is provided out of the box, a full roll of filament, and small machinist's square can make things much easier and more accurate.

Select the correct input voltage to match your local mains (230v or 115v) because of software/hardware upgrades and model differences, new revisions may not be listed in this guide... .. While the assembly process is not hard, there are a few things that should be done right.
25.07.2020 · assembling the ender 3 pro takes several hours and can be accomplished in an afternoon. If you want to get a feeler gauge as well, go ahead, but i found developing a feel for the machine first using sheets of paper added considerable. Select the correct input voltage to match your local mains (230v or 115v) because of software/hardware upgrades and model differences, new revisions may not be listed in this guide. Contents [ hide 1 content 2 notes 3 product introduction 4 equipment parameters 4.1 basic parameters 5 spare parts 6 1. Inspect the parts to make sure they were not damaged in shipment. Remove the parts from the box and remove any tape and padding from the parts. 23.09.2019 · ender 3 pro optimieren. 25.07.2020 · assembling the ender 3 pro takes several hours and can be accomplished in an afternoon. The base of the printer containing the print bed and the y axis (back and forth) control as well as most of the wiring are already assembled before leaving the … Given that, i decided to add my own supplemental instructions to go along with the simple instructions given … Check the items on list 1 and list 2.
While the assembly process is not hard, there are a few things that should be done right. Und dann das bett leveln. 25.07.2020 · assembling the ender 3 pro takes several hours and can be accomplished in an afternoon. 07.02.2019 · i bought an ender 3 pro, and while it was obviously a cost cutting design, i am very pleased with what i've got for the money. The base of the printer containing the print bed and the y axis (back and forth) control as well as most of the wiring are already assembled before leaving the … Select the correct input voltage to match your local mains (230v or 115v) because of software/hardware upgrades and model differences, new revisions may not be listed in this guide. Detailed instructions for use are available on the sd card. The ender 3 pro comes partially assembled. Given that, i decided to add my own supplemental instructions to go along with the simple instructions given … While nearly everything you need is provided out of the box, a full roll of filament, and small machinist's square can make things much easier and more accurate.

Inspect the parts to make sure they were not damaged in shipment... Und dann das bett leveln. Contents [ hide 1 content 2 notes 3 product introduction 4 equipment parameters 4.1 basic parameters 5 spare parts 6 1. Check the items on list 1 and list 2. While nearly everything you need is provided out of the box, a full roll of filament, and small machinist's square can make things much easier and more accurate. Detailed instructions for use are available on the sd card. Remove the parts from the box and remove any tape and padding from the parts. Install aluminum extrusions (l) and (r) to base (ba) step. 07.02.2019 · i bought an ender 3 pro, and while it was obviously a cost cutting design, i am very pleased with what i've got for the money. 07.02.2019 · i bought an ender 3 pro, and while it was obviously a cost cutting design, i am very pleased with what i've got for the money.

23.09.2019 · ender 3 pro optimieren. . Do not use the printer in any.

The biggest short coming i found was with the instructions. 25.07.2020 · assembling the ender 3 pro takes several hours and can be accomplished in an afternoon. Select the correct input voltage to match your local mains (230v or 115v) because of software/hardware upgrades and model differences, new revisions may not be listed in this guide. The base of the printer containing the print bed and the y axis (back and forth) control as well as most of the wiring are already assembled before leaving the … Install aluminum extrusions (l) and (r) to base (ba) step. The base of the printer containing the print bed and the y axis (back and forth) control as well as most of the wiring are already assembled before leaving the …

While nearly everything you need is provided out of the box, a full roll of filament, and small machinist's square can make things much easier and more accurate. The ender 3 pro comes partially assembled. Initial setup and recommended prints: While the assembly process is not hard, there are a few things that should be done right. Check the items on list 1 and list 2. Do not use the printer in any. The base of the printer containing the print bed and the y axis (back and forth) control as well as most of the wiring are already assembled before leaving the … The wiring harness of component (ba) and component (n) has already been connected. Install aluminum extrusions (l) and (r) to base (ba) step. Inspect the parts to make sure they were not damaged in shipment. The ender 3 pro comes partially assembled.

Contents [ hide 1 content 2 notes 3 product introduction 4 equipment parameters 4.1 basic parameters 5 spare parts 6 1. Contents [ hide 1 content 2 notes 3 product introduction 4 equipment parameters 4.1 basic parameters 5 spare parts 6 1. Initial setup and recommended prints: 23.09.2019 · ender 3 pro optimieren. 25.07.2020 · assembling the ender 3 pro takes several hours and can be accomplished in an afternoon. Select the correct input voltage to match your local mains (230v or 115v) because of software/hardware upgrades and model differences, new revisions may not be listed in this guide. While nearly everything you need is provided out of the box, a full roll of filament, and small machinist's square can make things much easier and more accurate. Inspect the parts to make sure they were not damaged in shipment. The base of the printer containing the print bed and the y axis (back and forth) control as well as most of the wiring are already assembled before leaving the … The biggest short coming i found was with the instructions.. Detailed instructions for use are available on the sd card.

The ender 3 pro comes partially assembled.. Remove the parts from the box and remove any tape and padding from the parts. Check the items on list 1 and list 2. The base of the printer containing the print bed and the y axis (back and forth) control as well as most of the wiring are already assembled before leaving the … The ender 3 pro comes partially assembled. Und dann das bett leveln. Select the correct input voltage to match your local mains (230v or 115v) because of software/hardware upgrades and model differences, new revisions may not be listed in this guide. Do not use the printer in any.. Und dann das bett leveln.
Initial setup and recommended prints:.. The biggest short coming i found was with the instructions. Inspect the parts to make sure they were not damaged in shipment. Contents [ hide 1 content 2 notes 3 product introduction 4 equipment parameters 4.1 basic parameters 5 spare parts 6 1. 23.09.2019 · ender 3 pro optimieren. While nearly everything you need is provided out of the box, a full roll of filament, and small machinist's square can make things much easier and more accurate. Initial setup and recommended prints: The ender 3 pro comes partially assembled. Given that, i decided to add my own supplemental instructions to go along with the simple instructions given … Remove the parts from the box and remove any tape and padding from the parts.. The biggest short coming i found was with the instructions.

Check the items on list 1 and list 2.. Check the items on list 1 and list 2. Given that, i decided to add my own supplemental instructions to go along with the simple instructions given … Inspect the parts to make sure they were not damaged in shipment. Remove the parts from the box and remove any tape and padding from the parts. The biggest short coming i found was with the instructions. Und dann das bett leveln.

The base of the printer containing the print bed and the y axis (back and forth) control as well as most of the wiring are already assembled before leaving the …. Detailed instructions for use are available on the sd card.. The ender 3 pro comes partially assembled.
Install aluminum extrusions (l) and (r) to base (ba) step. Detailed instructions for use are available on the sd card. Install aluminum extrusions (l) and (r) to base (ba) step. The ender 3 pro comes partially assembled. While nearly everything you need is provided out of the box, a full roll of filament, and small machinist's square can make things much easier and more accurate. 07.02.2019 · i bought an ender 3 pro, and while it was obviously a cost cutting design, i am very pleased with what i've got for the money. The base of the printer containing the print bed and the y axis (back and forth) control as well as most of the wiring are already assembled before leaving the … Do not use the printer in any.

23.09.2019 · ender 3 pro optimieren. Und dann das bett leveln. Contents [ hide 1 content 2 notes 3 product introduction 4 equipment parameters 4.1 basic parameters 5 spare parts 6 1. 25.07.2020 · assembling the ender 3 pro takes several hours and can be accomplished in an afternoon.

Given that, i decided to add my own supplemental instructions to go along with the simple instructions given … While the assembly process is not hard, there are a few things that should be done right. Remove the parts from the box and remove any tape and padding from the parts. Detailed instructions for use are available on the sd card. The base of the printer containing the print bed and the y axis (back and forth) control as well as most of the wiring are already assembled before leaving the … Inspect the parts to make sure they were not damaged in shipment. If you want to get a feeler gauge as well, go ahead, but i found developing a feel for the machine first using sheets of paper added considerable.. Detailed instructions for use are available on the sd card.


